Lawn tending season is approaching and I have a little 4 zone system set up with the obligatory Orbit controller. However I want to have manual control over my sprinklers that is easier than trying to use the controller’s manual mode. With this setup I’m able to keep the grass green and spray the neighbor’s pets and kids when they come into the yard. Using a Control4 system, some Card Access devices, a soil moisture sensor and a trip to Home Depot is all you need. You can also get some of the parts on Amazon.
Here’s the shopping list:
2 Card Access Wireless Relays (One relay will control 2 zones)
1 Card Access Contact Sensor ( If you want to use a soil moisture sensor)
1 Card Access Mini remote (For on-demand sprinkling but any Control4 input will do)
1 Orbit 57095 Sprinkler System Control Timer Box
1 Extension cord to power the transformer and valves
1 16V doorbell transformer (Home Depot has them for $15, but also has the Hardwired Chime Kit that has the same transformer plus buttons and a chime for $10, go figure.)
1 Vegetronix Soil Sensor and relay board
1 bag of 6-32 Nuts and bolts, 1/2″ long to mount the backplates. (4 per backplate)
My system has 4 of these orbit valves, but there are many similar ones that can be controlled the same way:

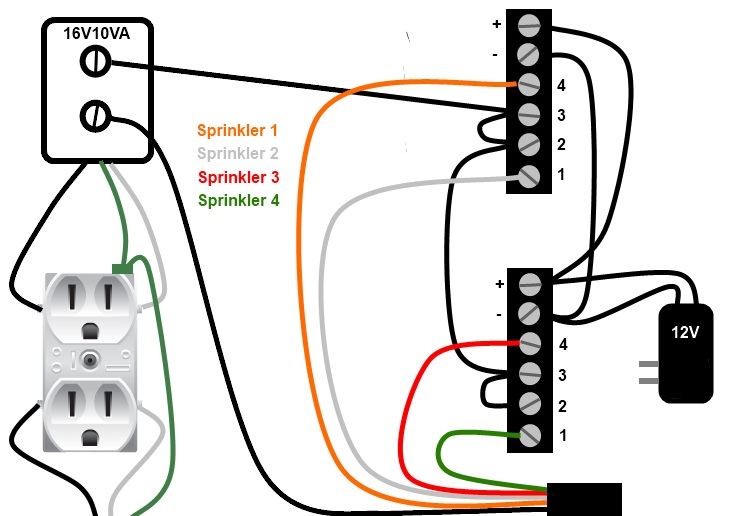
The first step is getting a grip of the wiring involved. Using this diagram you can see that you have to wire the female end of the extension cord to the outlet, wire the power from the outlet to the transformer, connect the transformer power to the backplates and connect the valve wires to the backplates. The 12V power supply comes with the relays. One side of the transformer goes to the sprinkler bundle common and the other side to the relays. Each valve connects to the common and its colored wire to the other side of the relays.

I recommend starting with removing the mounting plates from the box, mounting the transformer, connect the extension cord to the outlet and transformer first. Then connect all the wires to the backplates, then mount the backplates to the mounting plate, then re-mount the mounting plate in the box. Be sure to run the sprinkler and extension cord through the hole in the bottom of the box. When you are done it should look something like this:

I kept the transformer power separate from the relay’s 12v power. Here’s a close-up of the terminal block wiring on the relay backplates and with the relays mounted, and room for the contact sensor if you want to add one later:


If you want to add a soil moisture sensor, just get one that has a simple relay closure you can monitor with a contact sensor as shown in the diagram below.

The Vegetronix soil sensor connects to one of their relay boards. The sensor will trip the relay when it detects enough moisture. The contact sensor detects the relay closure and you can set up your automation or variable-dependent actions off of a variable status linked to this closure.

The relay board is adjustable so you can adjust when it trips open or closed based on your preferred moisture level. You can also invert the relay.

Next ID the relays, contact sensor (if you are using one) and mini remote into the project. Add and bind a sprinkler proxy for each device to the Card Access relay outputs. Give the devices friendly names with wire colors so they are easier to program and wire up:

From here you can set up the scheduler to open and close the relays. I want each of my zones to run every other day, early in the morning and to stop in October. I scheduled them to run at different times to be sure I had enough water pressure when it activated:

Next set up a timer for how long you want the sprinkler to run. Mine’s 15 minutes. Then in programming, set your scheduler to start the timer. Do this for each zone.

When the timer starts, program the sprinkler zone to turn on, and when it expires, turn off:


Now if you want to use the soil sensor to disable the sprinkler, you have to add it into your programming to not turn on if the sensor is open. (remember, dry=closed). Then if the sensor is open (wet) the timer will not start and the sprinkler will not activate.

On my mini remote, I used the multi-page driver and set the sprinkler page to have the blue LED, then set each of the 4 buttons to toggle a zone. then if I see the garden’s getting too dry and I don’t want to wait for the scheduler cycle I can just toggle it on as needed or control the other zones from the remote to chase off stray animals or neighbor kids.