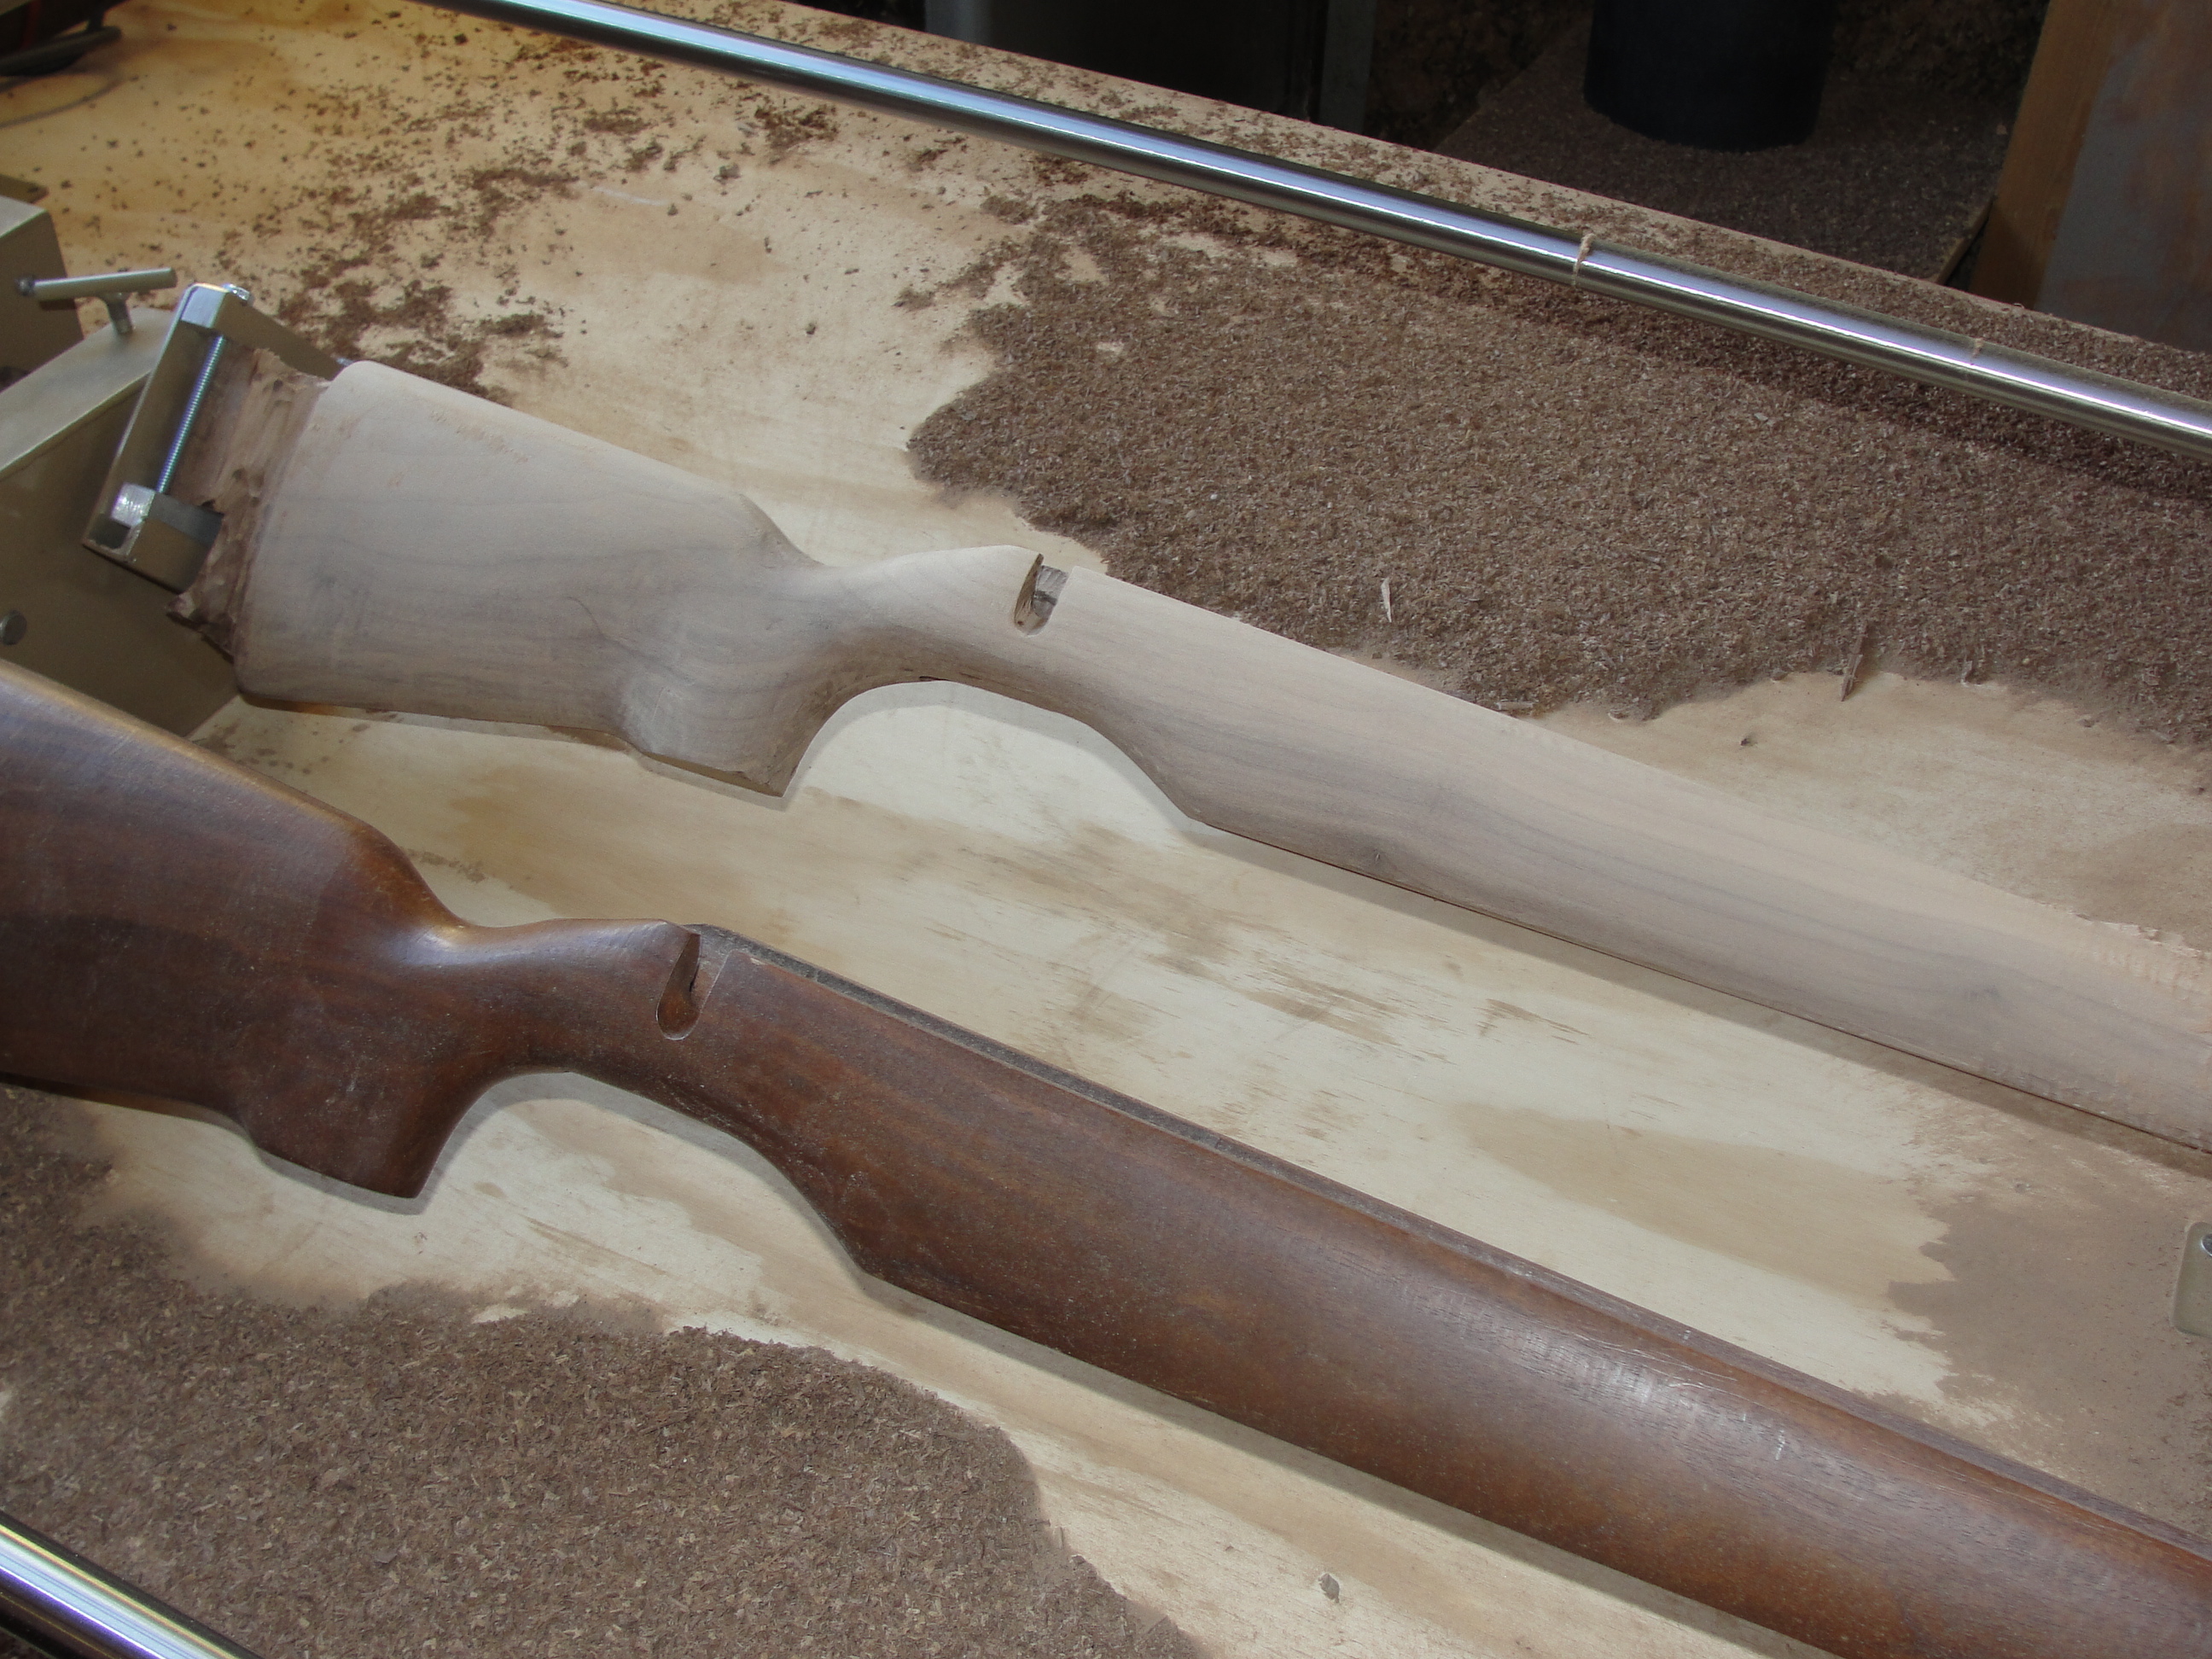
I collect a old rifles in assorted states of disrepair and bring them back to life and many times they have broken stocks. I bought the radarcarver to be able to duplicate the broken stocks in new wood and fancy laminates. I wish I would have found a review like this before buying the radarcarver. If you are looking for a thumbs up or thumbs down review, this thumb is sideways but it can be brought up to acceptable hobby use with some tweaking and extra purchases.
Let’s start with the manufacturer’s claims from their website:
“The entire machine is absolutely rigid and non-flexing. Because of this, extreme accuracy is standard.”
False. The main long rails flex with a little pressure such as you resting your arm on the rail. This causes the main yoke with the stylus and router to rotate and cut deeper than you expect into the side of your work.
“Setup is accomplished in a matter of minutes on your own table, which can be as simple as a piece of plywood. “
True. A nice thick piece of one inch ply or OSB is perfect.
“It will exactly duplicate a stock in about an hour and has superb accuracy.”
A Model 1 out of the box won’t. Figure two hours and accuracy based on your own practice and skill.
The price point was right so I got the model #1 with the longer rails, additional clamping head and motorized rotating unit. There are some other things you should get before diving into your first project:
Dust control. I got this nice little Delta unit on Amazon which will do fine. You’ll also need some extra hose and collector to make a collector attached to your router.

Next, take the stylus holder that comes with it and throw that piece of crap away.

It’s off center for ‘adjustability’ but if you adjust one direction X or Y direction, it un-adjusts the other. Plus the set screw that holds the stylus in place digs into the shaft of your stylus making it nearly impossible to remove and ruining your stylus. Get a collet extender from a machine shop supply place, it’s waaaaay better. 5/8″ shaft, 1/4″ collet, 6″ length. I think I paid about $75 for mine.

Get a good solid table to work on. I got this fabric measuring table from a local walmart that closed. It’s rock solid and has raised metal rulers all the way around which are very handy. I screwed my plywood right into the table.

The other thing I didn’t like was the setup was not tall enough to duplicate larger gun stocks, and the whole setup had to be raised. Go ahead and make little plywood risers for all of your components.


I prefer to have the cutter AWAY from me. Set yours up like this too, you want your hand on the stylus.
Make a little rack for all of your styluses and bits.

I also have a pair made of a long straight 1/4 mill bit and matching plain stock for the stylus for deep in-letting. This is a requirement if you are doing gunstocks as the short bits that come with it will result in your router collet grinding into the edge of your work as you try to force the short bits into the inlet. Plus with a long bit you can have your router perpendicular to your work instead of rotated as you try to go deep.

Once you have all your pieces attached to your table, get that dust collector setup with something like this to gather the dust. It’s wont get all of the larger bits but it will get the dust. You want this. You and the garage will be covered in dust in 3 minutes if you don’t. I just used some zip ties and scrap wood to get it right where the main dust stream shoots right into it.

I Also used some scrap closet door and plywood to make walls around the work to keep the wood chips from flying all over and came up with this nice little workplace setup:

So, now that you are all setup and ready to make tons of sawdust here are some tips on technique:
This unit flexes. you will lean on the guide rail and the side of your bits will rotate and cut too deep into your wood. So after about 2 dozen marginally acceptable stocks I came up with the following tips which has since resulted in really good, even sell-able work!
- Let the router do the work. This means don’t force the bit hard into the wood. Let the speed of the bit do the work, not the pressure.
- Get a longer 1/4 stylus and mill bit if doing any in-letting.
- Get the copycarver bit and stylus sets.
- Get the larger router option. It will save hours of work in the long run.
- Cut ‘thick’ meaning adjust the cutter height to leave some meat on the cut wood. You can sand the defects from the bit cutting too deep, later.
- Cut on the top of the work only, don’t try and cut ‘down the sides’.
- Cut as much wood off the new stock as you can with a saw prior to using the router.
Now because this thing flexes and bends like a Romanian gymnast you have to keep that in mind. If you push the yoke (the thing with the stylus and router on it) too hard, the yoke bends. It didn’t take much pressure on the yoke or rails to ruin a dozen stocks like this before I figured out a good technique:

Pushing on the yoke too hard sent the cutter too deep sideways into the surface, same with leaning on the main bar. What I have learned to do is once the stylus and cutting bit are perfectly matched into position, I hold the stylus off the original with my fingertips, about 1/8 of an inch so if it does bend and flex sideways into the new stock, I have some extra thickness to be able to sand it flush. You can also just raise your cutter high into the router a tiny bit to do the same thing. Keep in mind this only works on the vertical axis, not sideways, so cut as much as you can on the top surface and rotate it when you get tempted to cut down the sides with the side of your bit.
- Start with the square ended cutter to do the gross wood removal, leave 1/4 to half an inch on the stock.
- Then use the round edged cutter to get close, until it looks like this. It’s still rough but I have about a 1/16 thick layer extra left on the new stock:

- Then use the fine copycarver round bits to do the final surface. By using increasingly fine bits it reduces the temptation to cut too close and do damage to your final surface.


Using this setup, practice and tips you will be able to put out a good smooth stock in about 2 hours!


Excellent advice and description.
Thanks,
Tim
How sturdy and how accurate is the rotating mechanism. Some i have seen do not turn in unison regardless of how much you secure them or adjust after the the cutting starts.
Rick
It is acceptable, as long as you don’t bend the side rails at all it will not rotate perpendicular to your work.
I have a model 1 and I’m having a hard time securing the forend of the template stock.
Have any suggestions?
I just have the hole drilled into the original stock, holds fine on the head unit, need more detail on what you are doing.
okay what about when you’re done to you just use a dremel to getthat portion filled out? Talking about the forend of the stock where you have the screws to hold the stock in place, or do you still use a duplicator that part?
i dont think I understand what you are doing. You screw a block of wood to the back part of the original butt with some strong screws and clamp onto that. Then just cut off the extra on your copy when you are done.
I’ll see about adding some pictures. I’m trying to duplicate a M1A stock. I’m trying to secure the front of the stock as it keeps slipping. I see that you have screwed the front of the stock with the “green” default screw included with the duplicator. Did you experience the stock slipping?
Also, thanks for taking the time to respond to my previous questions. Appreciate the help.
I dont know why yours is slipping, If the clamp is on one end, and the hole at the other is the same size as the pin, it shouldn’t slip.
Hello… I am the manufacturer of Radarcarve Duplicators and reading your review is a bit distressing for me. The problems that you mention were faced and corrected quite some time ago. The stylus holder has been redone so that removal is never a problem. There is no flex in the system and if longer steel side rails are fitted then additional parts are included so that the longest span is only 25″. Any chance you could revise your comments? I’d certainly appreciate it. Thanks, Lee Davis
Great write up. I have the same unit and had to solve most of the same issues. I’ve started looking for a collet extender. I mounted the forearm end using t rails which allows me to move from small 2 piece forearms to Mannlicher. I also have a couple braces that I slide under the long rails as well as leaving the short normally. On my patterns I drill a hold in the end and then epoxy a washer for the screw shoulder to run against. If needed I install a spacer usually epoxied in place. On stocks that I need to reuse I have a small length of angle iron that I attach in the barrel channel of the old stock that has a block with mounting hole attached. I also made an adjustable tail mounting block.
Wish I had seen something this good before I started.
I am always glad to hear from a manufacturer who improves their products. I would be quite happy to get these parts as I have been on the fence about upgrading to the larger router for a while now too. I will be contacting you about these additional parts. I will of course be glad to append my review and experience once I try them out.
Thanks for this its going to help me alot set up my radar carve .when I mde it up I hadthe same problem I was shapeing one side perfect the wrecking other side
With being in the uk whats the shaft extention size I would need for my followers .. atb steven
do you have a mail order source for the bits and collet extender.on the forestock it looks as if yours threads into the barrel area not using the t bolts.thank you for any help or advice
I found places that have them are good old fashioned machine shop supply places that cater to local machinists, not so much web-based sales.
Give Lee a break.
His machine is 4k cheaper or more than the others. Even though upgrades are nice, they cost more. If you buy a cheaper machine, don’t expect a 7k machine for 1100 bucks
Regardless of the price, when a seller states something on his main web page, he should be ready for that claim to be examined and evaluated publicly. When the terms “absolutely rigid and non-flexing” are used, that is what should be provided. When the items are NOT as claimed, he should utilize that feedback in future product development. If a seller is going to put something out for public use he should expect public evaluation whether it supports or contradicts his claims.
Hi,
How are you finding the machine after a bit more time with it? do you find you can accurately copy the inletting?
thanks for your informative post, I hope the radarcarve team have read and taken your advice onboard for improvements.
Hello, The system works fine with the larger router and extra side supports in addition to the other recommendations I have in the article. By fine, I mean with practice and patience you can make some pretty good copies.
In your original post you stated that if you new then what you know now you would not buy the Radarcarve. I read the comment from Mr. Davis and wonder if the situation did in fact get remedied and how you feel now, and what other machine you might recommend. The only other machine I’ve encountered is the Gemini and the cost of that machine is rather prohibitive to my budget. Thanks
Hello. He did provide some stand-offs that go under the rails that you can move around to help support the rail from bending. Those and some practice will make a good hobby-level setup most people can make copies with.
Check out the flip up (pivoting) mobile table I made for my carver. It would be handy for those wanting to save space, when the unit is not in use.
The base flips up easily and rolls with little effort.
http://lumberjocks.com/projects/248162
[I also posted the same photos on Router Forums web site. For either site, you can do a search for Kelly Craig, or the Radar Carver.
Hi
I run a company called OLS .We duplicate rifle stocks for a living.
I bought Lees first heavy duty router model.There where things that needed tweaking and all out changing.For that price point I would never have bought anything as useful.
I called Lee a lot of names at the time but now I’m grateful to him.
I have another machine that would cost $12,000 to replace. It makes 2 stocks at a time and doesn’t inlet near as precise as Lee’s.With his improvements I think Radar Carvers are worth the effort.
This guide is very handy, certainly will be upgrading my machine. Issue I have is the stock I am attempting to duplicate is quite easily bent, there does not appear to be any way of duplicating it accurately, the best I’ll be able to do is attempt to work four sides of the stock making supports to stop the original bending as I go, between Centers of the machine the stock will easily bend 1/4 inch which cases issue as you can imagine
What I had to do for really thin stock areas, such as the fore-end, is go ahead and cut the bottom and sides, then just the top flat of the stock, and take a LITTLE out of the channels with the machine…. then use a dowel wrapped in sandpaper to finish out the channel by hand.
This is neat! I have mine on a thick piece of plywood, and just lean it up out of the way when not in use.